Lab Guide - Apstra Freeform
Jinja based Config Template and Property Set Editing and Deployment
In this section of the lab, we will create a Config Template and include the needed code to insert a system login banner into each device in our blueprint. To do this, we will store the Banner text in a Property Set as a list of text strings.
First, review the Juniper documentation text for banners: Juniper’s reference for a login message/ Banner
In this case, we will create a login message/banner that dynamically incorporates individual device details. We will include statements that use data from each system’s Device Context, such as link information and the system hostname.
Let’s start with this stanza:
Create the Banner Property Set
First let’s create the Property set we will use to store the string text for the banner.
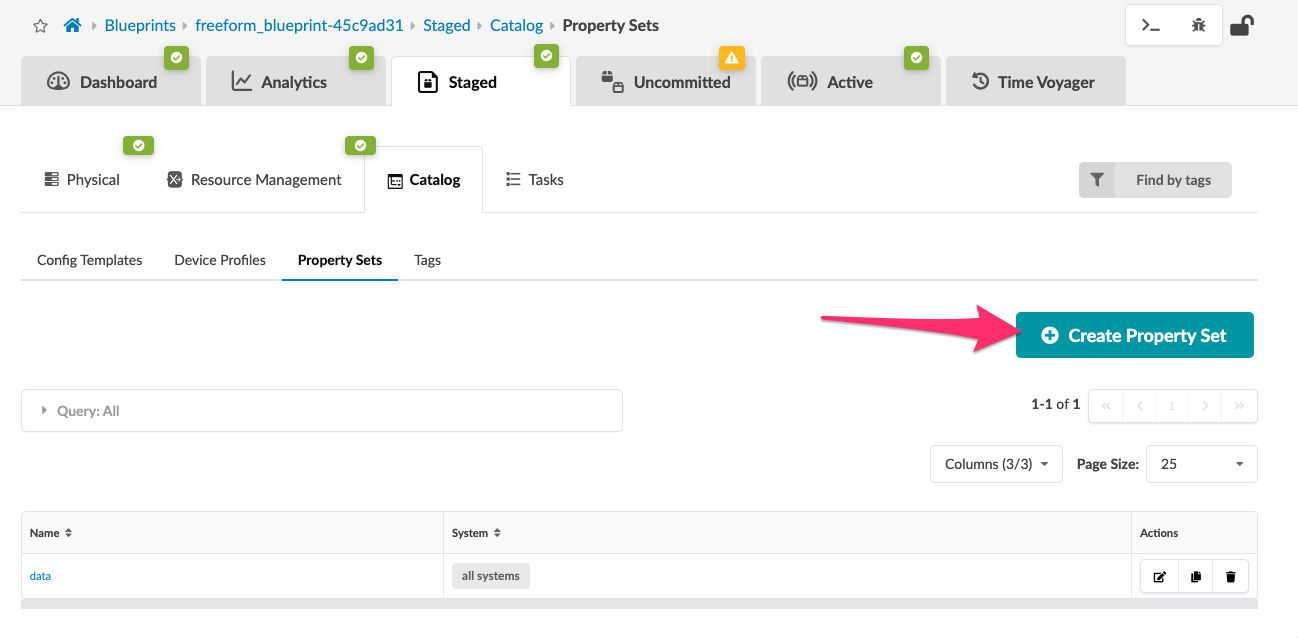
Note there are two methods to edit your Property Set, the builder or the editor. The builder is interactive and the editor allows for freeform text editing.
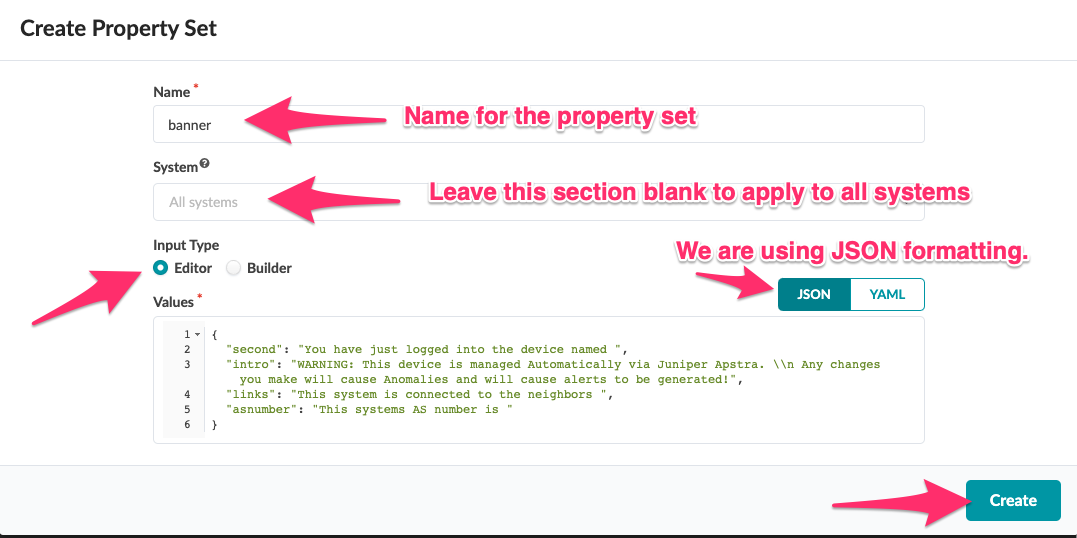
Below are the contents of the banner property set. We will use this text to create our lab property set.
View the new 'banner' property set in the device context
Let’s now navigate to the device context and view the property set instilled into the device context.

This concludes the work on Property Sets for now. We will use this later in the Jinja Config Template so stay tuned!
Update the main.jinja to use new_system.jinja
For the root main.jinja template to call the new_system.jinja, we need to update the main.jinja file.
Old text for main.jinja :
{% include "system.jinja" %}
{% include "interfaces.jinja" %}
{% include "protocols.jinja" %}
New text for main.jinja :
{% include "new_system.jinja" %}
{% include "interfaces.jinja" %}
{% include "protocols.jinja" %}
Changing to our new Jinja will allow the config to render in the editor (this won’t function unless the new_system.jinja is included in the processing chain), any new information we put in the file will make changes to the rendered configuration.
Create a New Config Template to Replace 'system.jinja'
Now let’s take the existing system.jinja Config Template and modify it to include a new banner message. This code may seem difficult to understand at first but don’t worry - we will go into details a bit later.
If you have difficulty with these steps, there are some ways you can test the interaction of your Freeform components when you are in the Edit mode for the Config Template. Device Context allows you to see the properties and property sets associated with your system. The Preview feature allows you to activate the code you are working on and shows the configuration that results from your work. Using this procedure to see how your edits affect the output is a good way of visualizing how all these components interact.
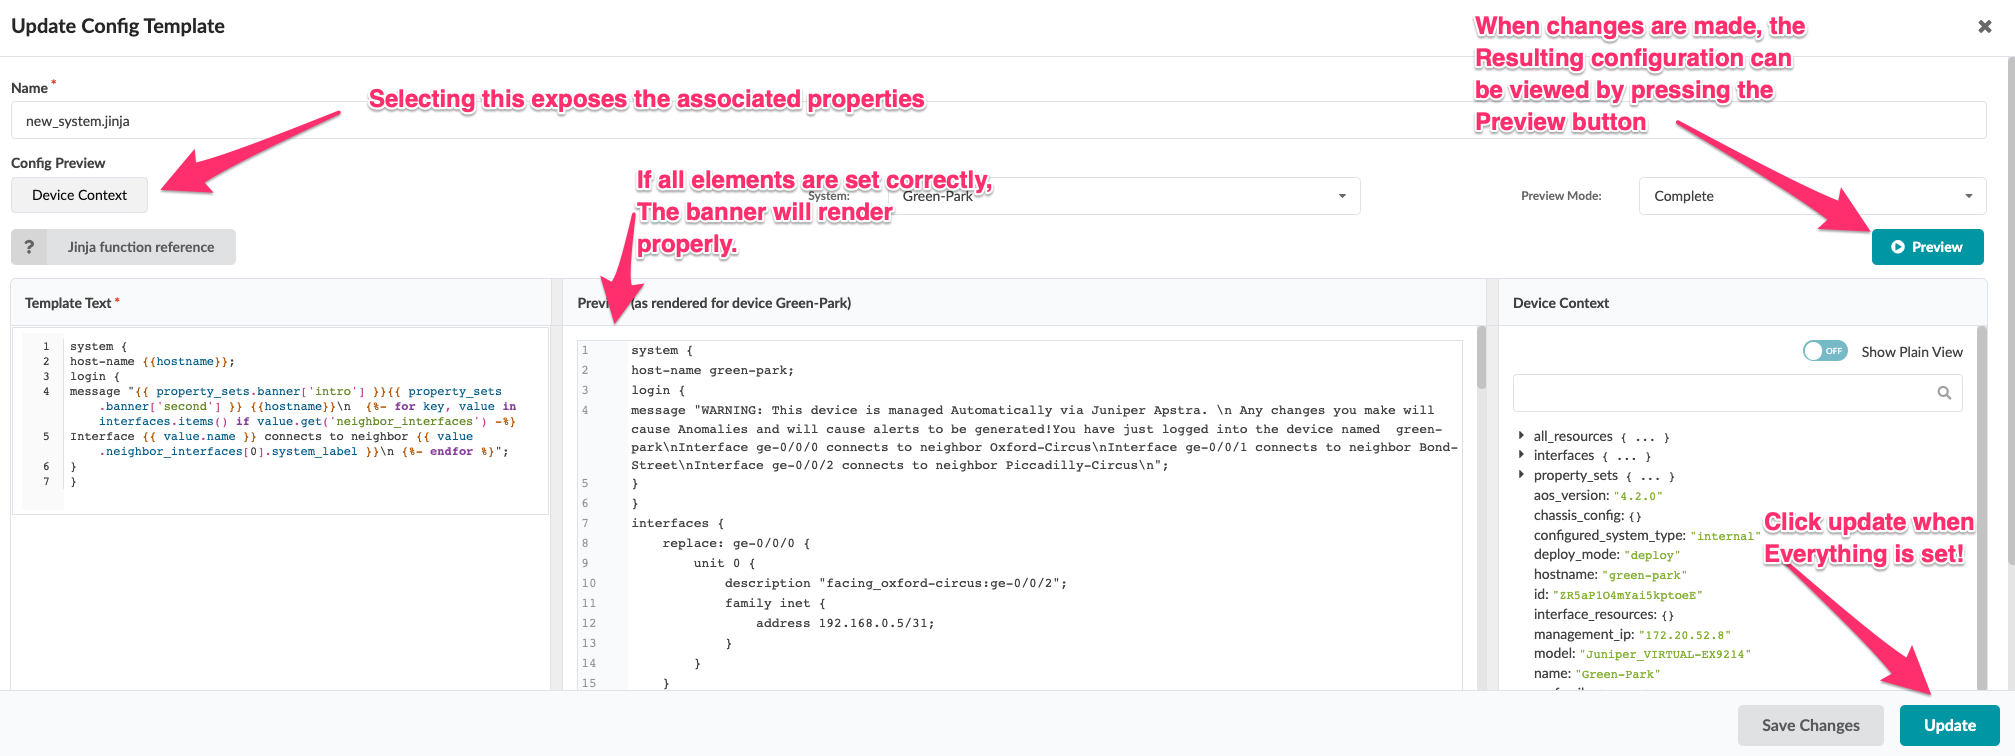
Save and Update the Changes and Commit
Now that you have made the changes and created a new Config Template, we must commit the changes to push to the systems and log in and check that our changes were implemented.
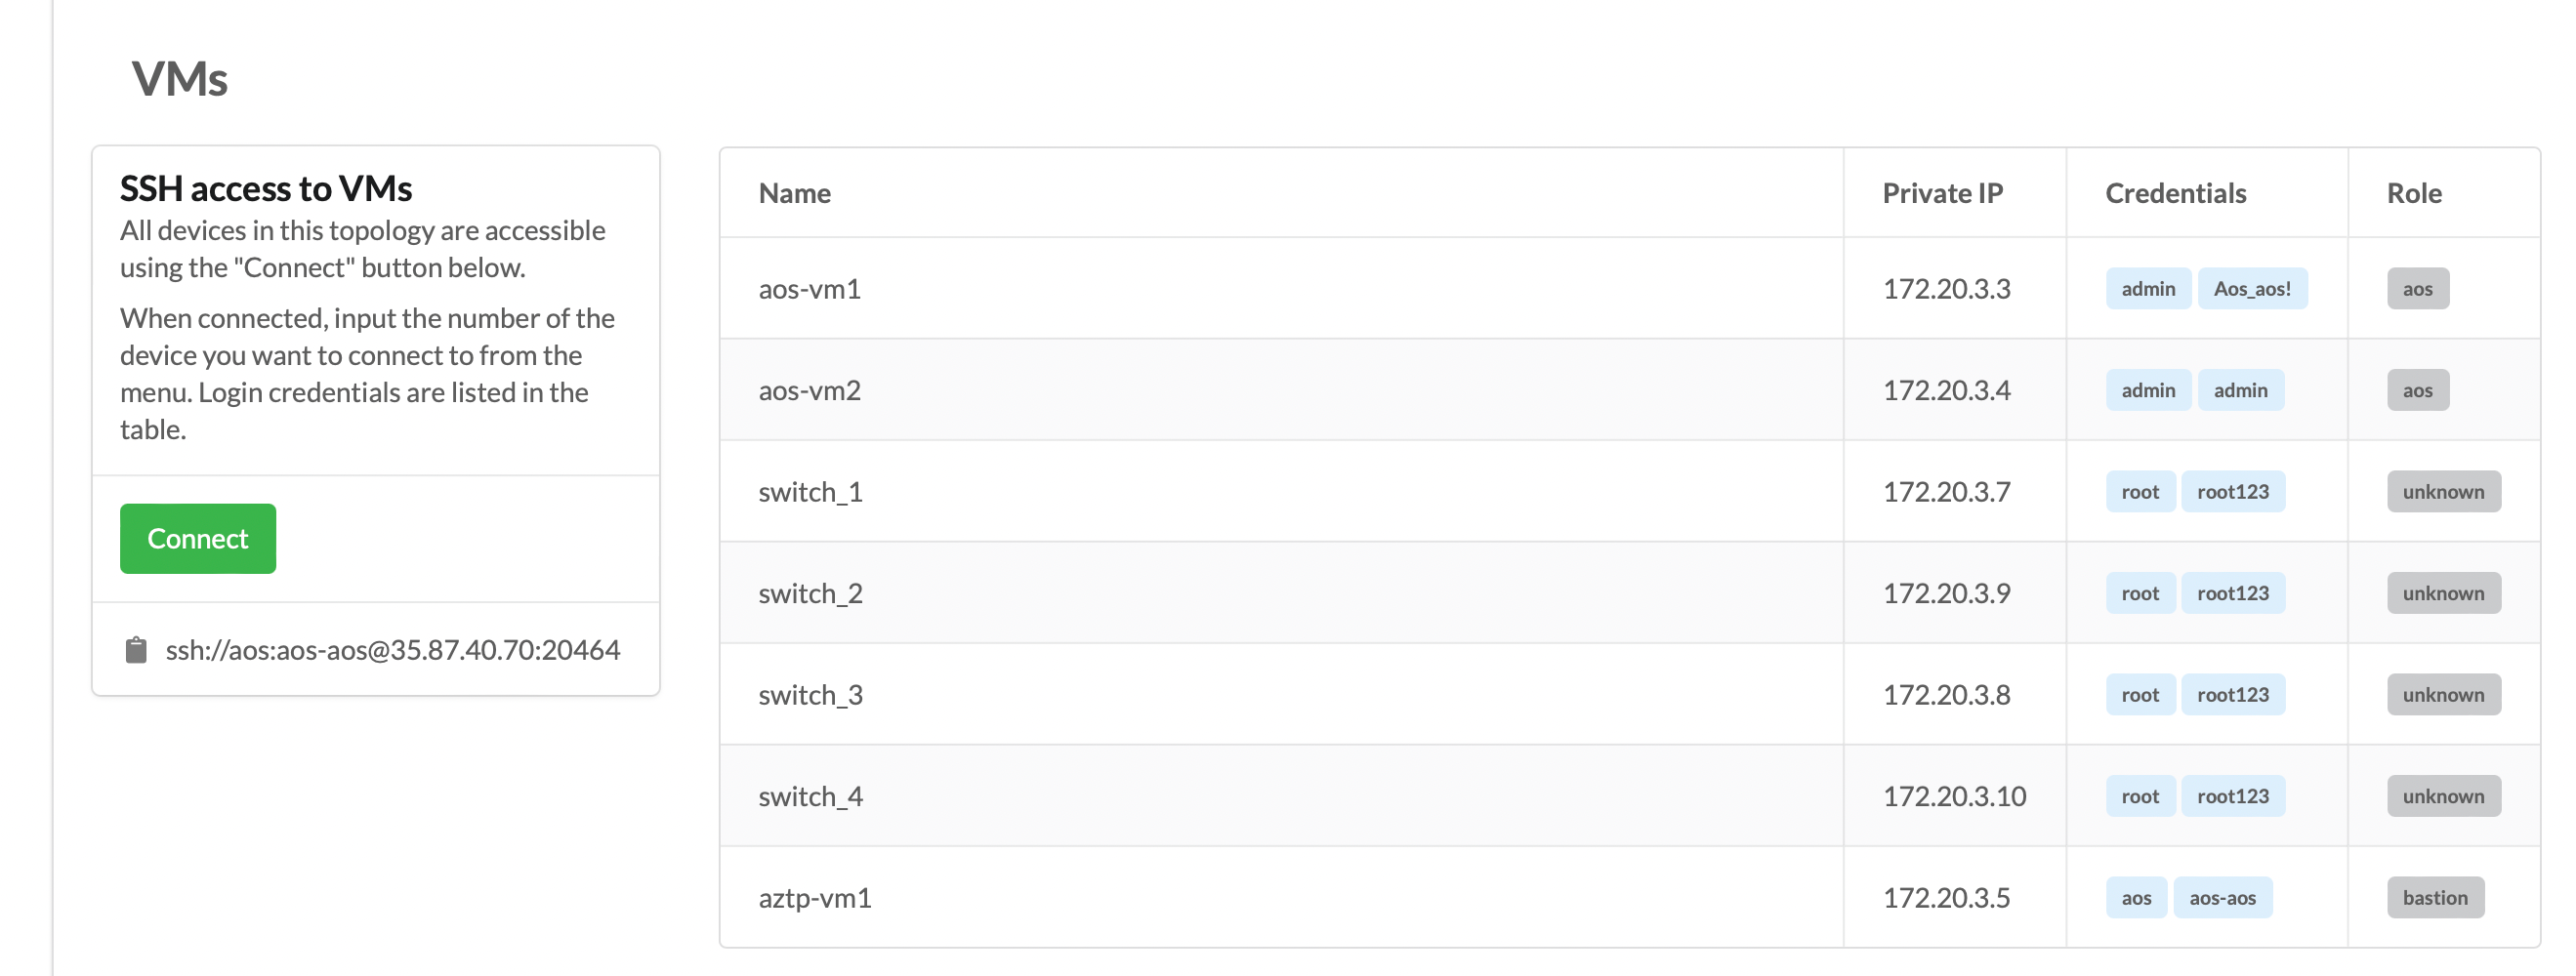
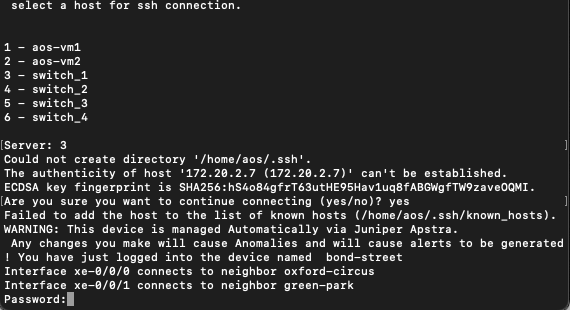
SSH into a couple of different devices in your environment. You will see that the login message is present on your systems.
-
ssh to the switch devices to verify your banner message appears.
To ssh into the system, access the Cloudlabs gui and follow the instructions for ssh access as depicted below
When successful, your terminal should look very similar to this one:
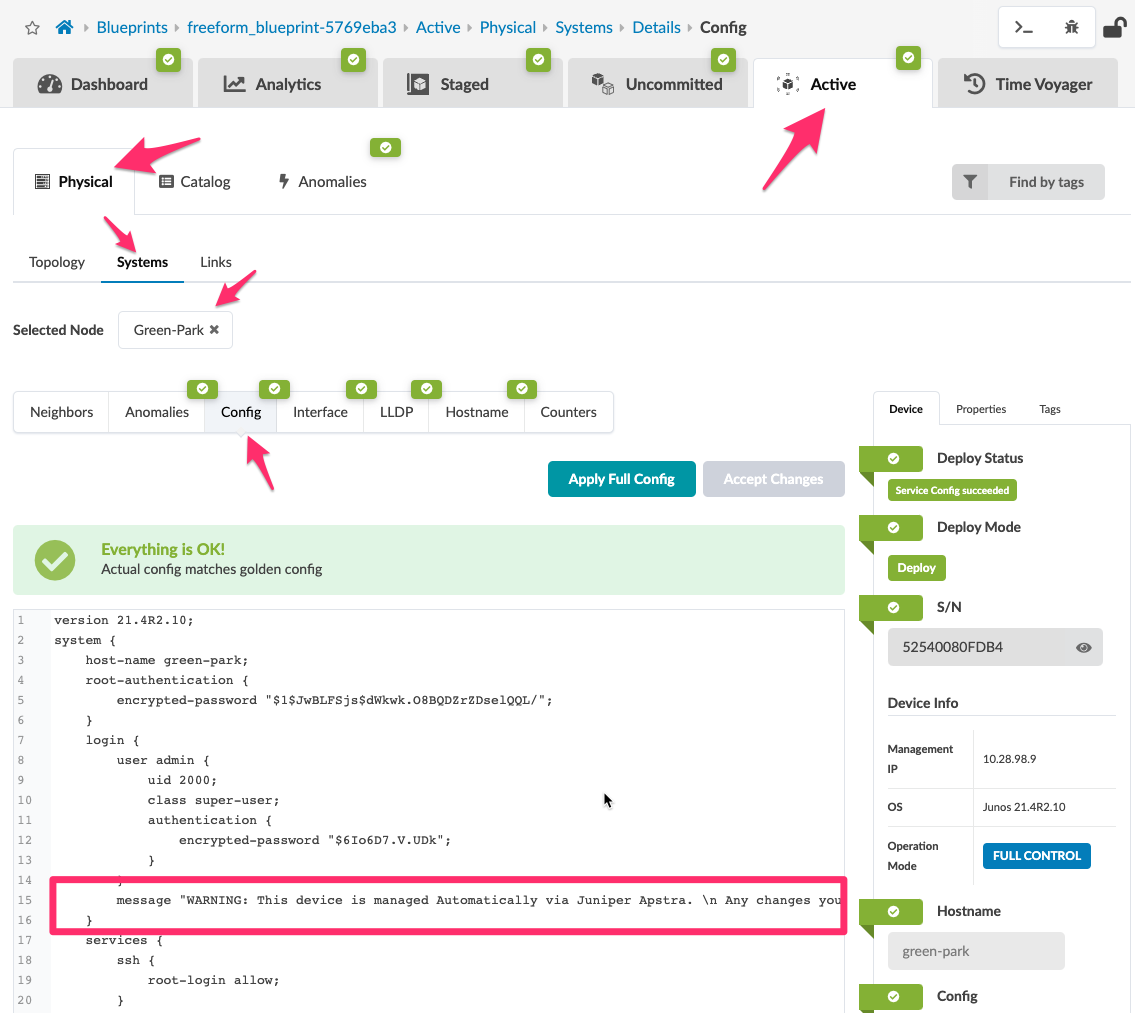
Investigate the Active device Config for verification
Another way we can verify that our Jinja code works correctly is to take a look at the Apstra UI and investigate the active configuration. Let’s do this now:
Dissecting the Banner Config Template Jinja
We are now going to explore in detail some of the Jinja code that generates the rendered configuration that we used for the login banner.
The first section of the Config Template we will explore is the following statement.
system {
		host-name {{hostname}};
		login {
			 message  "{{ property_sets.banner['intro'] }}{{ property_sets.banner['second'] }} {{hostname}}\n
From this statement you can see the message "{{property_sets.banner['intro']. This inserts the string of the Property Set called banner and finds the dictionary intro and inserts that string into the output after the word message ". The output should now display the rendered section of the config:
message "WARNING: This device is managed Automatically via Juniper Apstra. \n Any changes you make will cause Anomalies and will cause alerts to be generated! You have just logged into the device named "
Now the {{hostname}} code inserts the device hostname from the device context. You can see what this value is by navigating to the device context in the systems view of the topology. We covered this in the device context section you can refer to if you need to.
Now, the output should look like the following:
message "WARNING: This device is managed Automatically via Juniper Apstra. \n Any changes you make will cause Anomalies and will cause alerts to be generated! You have just logged into the device named Bond-Street"
Your First Jinja Loop
First, let’s start with a simple Jinja loop. A loop is used for iterating over a sequence, and in the example below, it shows a simple list being created then being iterated through.
Going through this line by line {% set _numList = ['one', 'two', 'three'] %} is simply setting a list of items that we will loop through list = one, two, three. Then we begin to loop through the list using a for loop {% for _num in _numList %}. This goes one by one through the list assigning the object to variable _num - i.e. _num = one.
In each iteration of the loop, we are printing the text - This number is {{ _num }} - and at each iteration the {{ _num }} variable changes. Finally, we close the for loop - {% endfor %}.
More Advanced Loops
Let’s take a look at the Jina loop that is used to find the neighbor interfaces and names:
This might seem complex but as we lay out what each line does in turn, you will see that it’s actually fairly straightforward.
For loops starting with {% for my_item in my_collection %} and ending with {% endfor %}. This is very similar to how you would loop over an iterable in Python.
Here my_item is a loop variable that will be taking values as we go over the elements. And my_collection is the name of the variable holding reference to the iterated collection.
key is our loop variable, and our iterated collection is interfaces.items().
The first if statement checks to see if a neighbor exists on that interface, and if so, the Jinja prints the interface and the neighbor by walking the device context tree and finds the neighbor. Let’s assume our interface is ge-0/0/0 it would evaluate ge-0/0/0.neighbor_interface[0].system_label] You would see the output similar to Interface ge-0/0/0 connects to neighbor Bond-Street Now, if we put all this together, we have a complete message that looks something like
message "WARNING: This device is managed Automatically via Juniper Apstra. \n Any changes you make will cause Anomalies and will cause alerts to be generated! You have just logged into the device named Green-Park. Interface ge-0/0/0 connects to neighbor oxford-circus Interface ge-0/0/1 connects to neighbor bond-street"
Feel free to try and modify this small snippet of Jinja code to your liking and see what changes you can make to create different configurations. You can see how this would allow an operator to generate a very large and dynamic config — they would then be able to keep updated by editing property sets to change or to add new variables.
Learn more about Jinja2
To find out more about using Jinja2 in your Config Templates, here are some great helpful links:
-
Jinja Documentation This is the reference documentation.
-
Jinja2 Tutorial Series This is a great 6 part series on using Jinja2.
We also draw your attention to our public gitHub repo that contains these Config Templates along with other templates publicly contributed.